Home
How-to Guides
How to Add Captions & Subtitles to BlueJeans Recordings

How to Add Captions & Subtitles to BlueJeans Recordings

table of contents
Hungry For More?

Luckily for you, we deliver. Subscribe to our blog today.

Thank You for Subscribing!

A confirmation email is on it’s way to your inbox.

Share this post

With more companies working remotely, there’s an ever-pressing need for enhanced video communication. While it’s true there are several platforms for hosting online company meetings, not all platforms come with the same features. 

If you’re looking to host a successful company meeting, it’s integral to find a platform that allows for live participation as well as recording. As you know, it’s easy for children or the family pet to interrupt meetings, which often results in meeting participants missing something important.

With the help of BlueJeans Recordings, you can easily host a meeting, record it, and return to it for future reference. Additionally, with the right tools, you can add captions and subtitles to your recordings to make them accessible. Let’s talk about the steps you need to take to ensure everyone on your team can watch a recording with subtitles or captions.

How to record a meeting in BlueJeans

BlueJeans meeting recording is simple. Once you, as the moderator, are logged into the meeting and ready to roll, you can start recording. Hover your mouse over the top banner. Then, you will see a grey “Start Rec” button on the top-left side of the meeting screen.

Image source: BlueJeans

Once you press this button, your participants will see a text banner and hear a notification that you’re recording the meeting. You can verify you are recording on BlueJeans by looking to see a red flashing light. This light indicates the recording is working properly.

When, you are ready to end your recording, click on the same button you clicked on to start the recording. The team will see a text notification and hear a verbal notification that the recording has ended.

And, that’s it! That’s how you record a meeting in BlueJeans.

How to download a BlueJeans recording file

Now that you’ve recorded your meeting, it’s time to access it. You can do this in one of two ways.

The first way is to check the email inbox that is associated with your BlueJeans account. After you have recorded your meeting, BlueJeans will automatically email you a copy of your recorded meeting.

Go to your email inbox, and click on the message from BlueJeans. The message will look like this.

If you don’t want to add captions, you can click on “Share Recording.” If you do, you’ll want to click on “View Recording.”

The second way to access your recording is through your BlueJeans account. 

All you have to do is login to your BlueJeans account via the URL: bluejeans.com/login. Then, look at the top navigation bar and click on “Recordings.”

From here, you will see a list of your recordings. Find the recording you want to download, look to the bottom right of the screen, and click “download.”

Then, save your downloaded file to the appropriate location on your computer, and you’re ready for the next step.

How to add captions or subtitles to your BlueJeans recording

You can’t add subtitles to your BlueJeans recording in the BlueJeans software. To add captions and subtitles, you’ll need to upload your recording to Rev. Here’s how.

If you don’t already have a Rev account, create one at Rev.com and login to your account.

Once you’ve logged into your Rev account, Rev will give you options, including transcription, captions, and foreign subtitles. To add captions, click “captions.”

Rev speech to text Services

Click “Place your order” on the next page, you have three options. You can upload files from your computer, share a link to a public web address, and pull videos from YouTube or Vimeo. Since you downloaded your video from BlueJeans, click on “Upload Files” and select the file you downloaded.
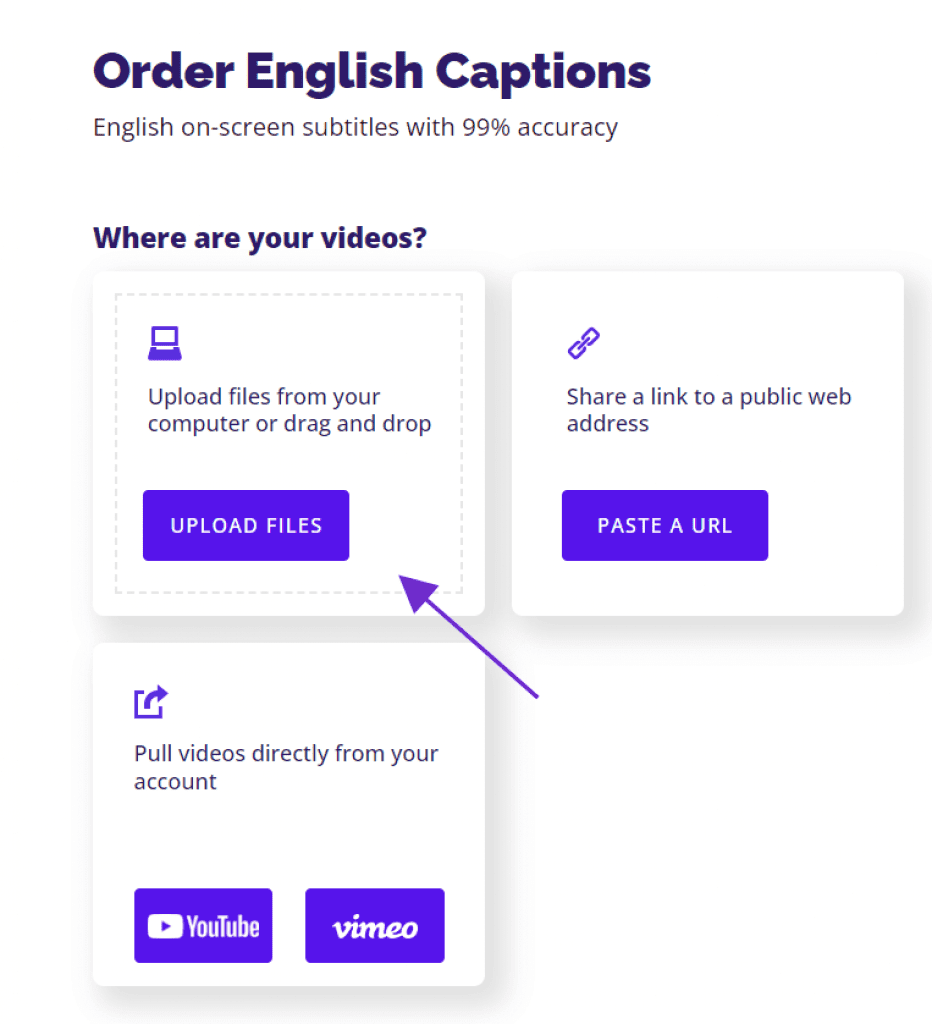
Order English Captions

Once Rev recognizes your file, click “Upload,” and wait for your file to upload. The amount of time it takes for the recording to upload may vary depending on how long you recording is. 

Rev Caption Order Upload

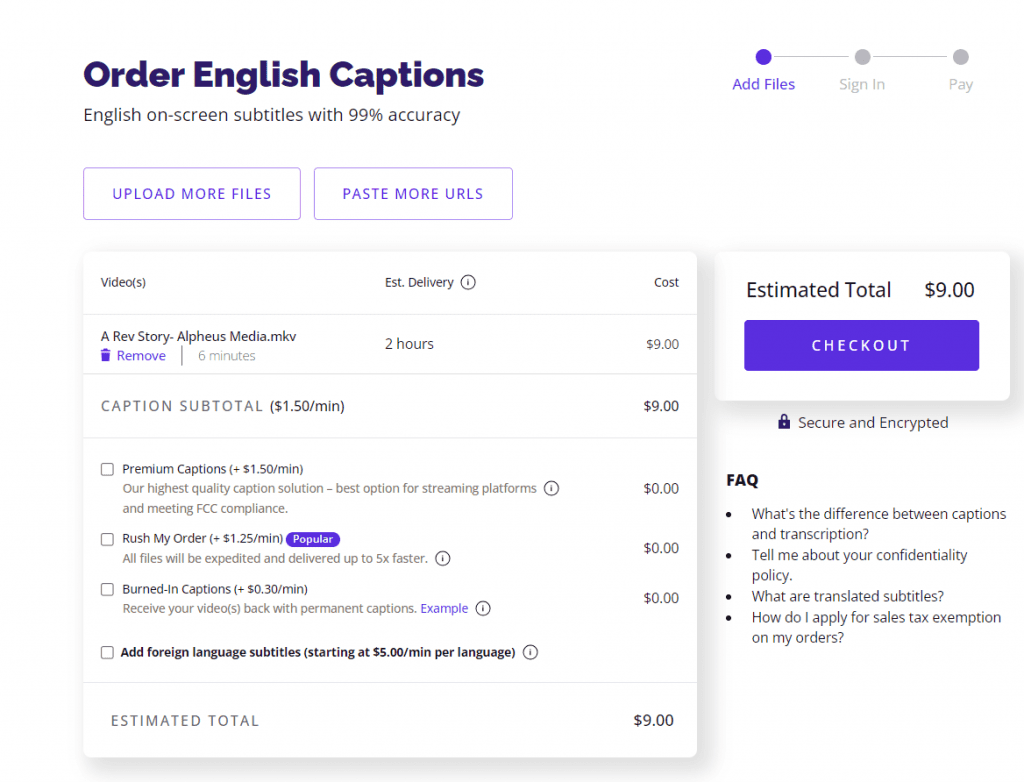
Here’s the fun part. You don’t have to do the captioning yourself. Rev is an affordable service that will do the hard work for you. Once you’ve uploaded your recording, Rev will direct you to an order page. Your cost estimate will be based on how many minutes your recording is.  
Direct Upload Checkout

You will also see an estimated delivery time, so there will be no question on how much time it will take to receive your recording back from Rev.

As you can see on the screenshot above, I uploaded a 1-minute video, so my price is only $1.25 and my estimated delivery time is 2 hours.

Once you complete the checkout process, a Rev employee will start on your order, and notify you when your delivery is complete.

If you have a foreign staff and need to translate your recording, you can follow the same process. Instead of selecting “Captions,” you’ll click “Foreign Subtitles.” 

Once you have clicked on “Foreign Subtitles,” Rev will send you to a page where you can select the applicable languages.
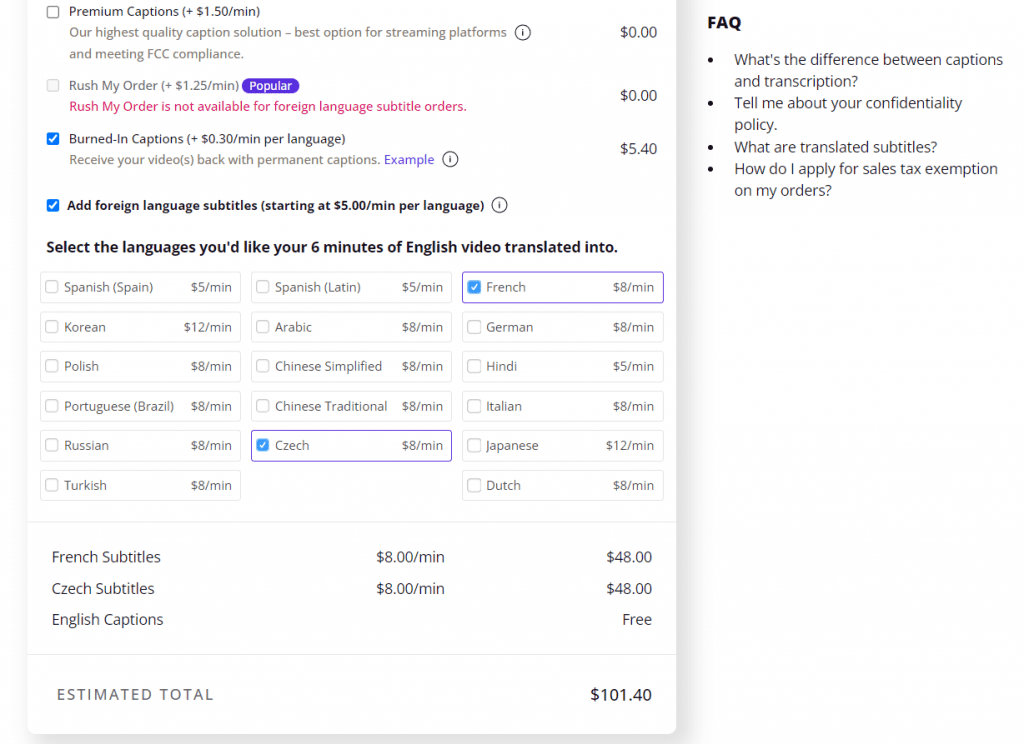
Foreign Subtitle

Again, Rev will show you the price estimate based on the language and length of the video, and the total price. When you’ve selected your languages, you can check out, and the Rev team will get working on your order.

Subscribe to the Rev Blog

Lectus donec nisi placerat suscipit tellus pellentesque turpis amet.

Share this post

Subscribe to The Rev Blog

Sign up to get Rev content delivered straight to your inbox.

General

How to Add Captions & Subtitles to BlueJeans Recordings

With more companies working remotely, there’s an ever-pressing need for enhanced video communication. While it’s true there are several platforms for hosting online company meetings, not all platforms come with the same features. 

If you’re looking to host a successful company meeting, it’s integral to find a platform that allows for live participation as well as recording. As you know, it’s easy for children or the family pet to interrupt meetings, which often results in meeting participants missing something important.

With the help of BlueJeans Recordings, you can easily host a meeting, record it, and return to it for future reference. Additionally, with the right tools, you can add captions and subtitles to your recordings to make them accessible. Let’s talk about the steps you need to take to ensure everyone on your team can watch a recording with subtitles or captions.

How to record a meeting in BlueJeans

BlueJeans meeting recording is simple. Once you, as the moderator, are logged into the meeting and ready to roll, you can start recording. Hover your mouse over the top banner. Then, you will see a grey “Start Rec” button on the top-left side of the meeting screen.

Image source: BlueJeans

Once you press this button, your participants will see a text banner and hear a notification that you’re recording the meeting. You can verify you are recording on BlueJeans by looking to see a red flashing light. This light indicates the recording is working properly.

When, you are ready to end your recording, click on the same button you clicked on to start the recording. The team will see a text notification and hear a verbal notification that the recording has ended.

And, that’s it! That’s how you record a meeting in BlueJeans.

How to download a BlueJeans recording file

Now that you’ve recorded your meeting, it’s time to access it. You can do this in one of two ways.

The first way is to check the email inbox that is associated with your BlueJeans account. After you have recorded your meeting, BlueJeans will automatically email you a copy of your recorded meeting.

Go to your email inbox, and click on the message from BlueJeans. The message will look like this.

If you don’t want to add captions, you can click on “Share Recording.” If you do, you’ll want to click on “View Recording.”

The second way to access your recording is through your BlueJeans account. 

All you have to do is login to your BlueJeans account via the URL: bluejeans.com/login. Then, look at the top navigation bar and click on “Recordings.”

From here, you will see a list of your recordings. Find the recording you want to download, look to the bottom right of the screen, and click “download.”

Then, save your downloaded file to the appropriate location on your computer, and you’re ready for the next step.

How to add captions or subtitles to your BlueJeans recording

You can’t add subtitles to your BlueJeans recording in the BlueJeans software. To add captions and subtitles, you’ll need to upload your recording to Rev. Here’s how.

If you don’t already have a Rev account, create one at Rev.com and login to your account.

Once you’ve logged into your Rev account, Rev will give you options, including transcription, captions, and foreign subtitles. To add captions, click “captions.”

Rev speech to text Services

Click “Place your order” on the next page, you have three options. You can upload files from your computer, share a link to a public web address, and pull videos from YouTube or Vimeo. Since you downloaded your video from BlueJeans, click on “Upload Files” and select the file you downloaded.

Order English Captions

Once Rev recognizes your file, click “Upload,” and wait for your file to upload. The amount of time it takes for the recording to upload may vary depending on how long you recording is. 

Rev Caption Order Upload

Here’s the fun part. You don’t have to do the captioning yourself. Rev is an affordable service that will do the hard work for you. Once you’ve uploaded your recording, Rev will direct you to an order page. Your cost estimate will be based on how many minutes your recording is.  

Direct Upload Checkout

You will also see an estimated delivery time, so there will be no question on how much time it will take to receive your recording back from Rev.

As you can see on the screenshot above, I uploaded a 1-minute video, so my price is only $1.25 and my estimated delivery time is 2 hours.

Once you complete the checkout process, a Rev employee will start on your order, and notify you when your delivery is complete.

If you have a foreign staff and need to translate your recording, you can follow the same process. Instead of selecting “Captions,” you’ll click “Foreign Subtitles.” 

Once you have clicked on “Foreign Subtitles,” Rev will send you to a page where you can select the applicable languages.

Foreign Subtitle

Again, Rev will show you the price estimate based on the language and length of the video, and the total price. When you’ve selected your languages, you can check out, and the Rev team will get working on your order.

The event's speakers are:

No items found.