Home
How-to Guides
How To Record Audio On Your Android Device

How To Record Audio On Your Android Device

table of contents
Hungry For More?

Luckily for you, we deliver. Subscribe to our blog today.

Thank You for Subscribing!

A confirmation email is on it’s way to your inbox.

Share this post

Having a tiny supercomputer in your pocket at all times is pretty handy, isn’t it? Your Android device is your watch, your music player, and your personal assistant. Heck, it’ll even tell you a joke. But one of the more underrated apps on your phone is the Android voice recorder.

Whether an impromptu interview opportunity pops up or you just need to record your own thoughts, the Android voice recorder is there. You can even record a whole podcast on your phone in a pinch!

Your phone’s built-in microphone isn’t always the ideal choice for audio recording, but voice recording on Android can get the job done when you need it. Here’s how to record audio on your Android device, no matter how you plan to use it.

Recording Audio on an Android via the Native App

Android phones come in a plethora of models from various manufacturers, including Samsung, Google, Sony, and Motorola, so the specific details of how to record audio on your Android device might vary slightly from what we post here.

But whether you’re using the Samsung voice recorder, the Google voice recorder, or any of the others, if it uses the Android operating system, the steps should be pretty similar for recording external audio.

Step 1: Open the Android Voice Recorder App

Your home screen should come preloaded with the red voice recorder app icon, but if you can’t find it, open “Settings,” then hit “Apps” and tap on the voice recorder. If for some reason it’s not installed on your Android device, you might need to download it from your app store.
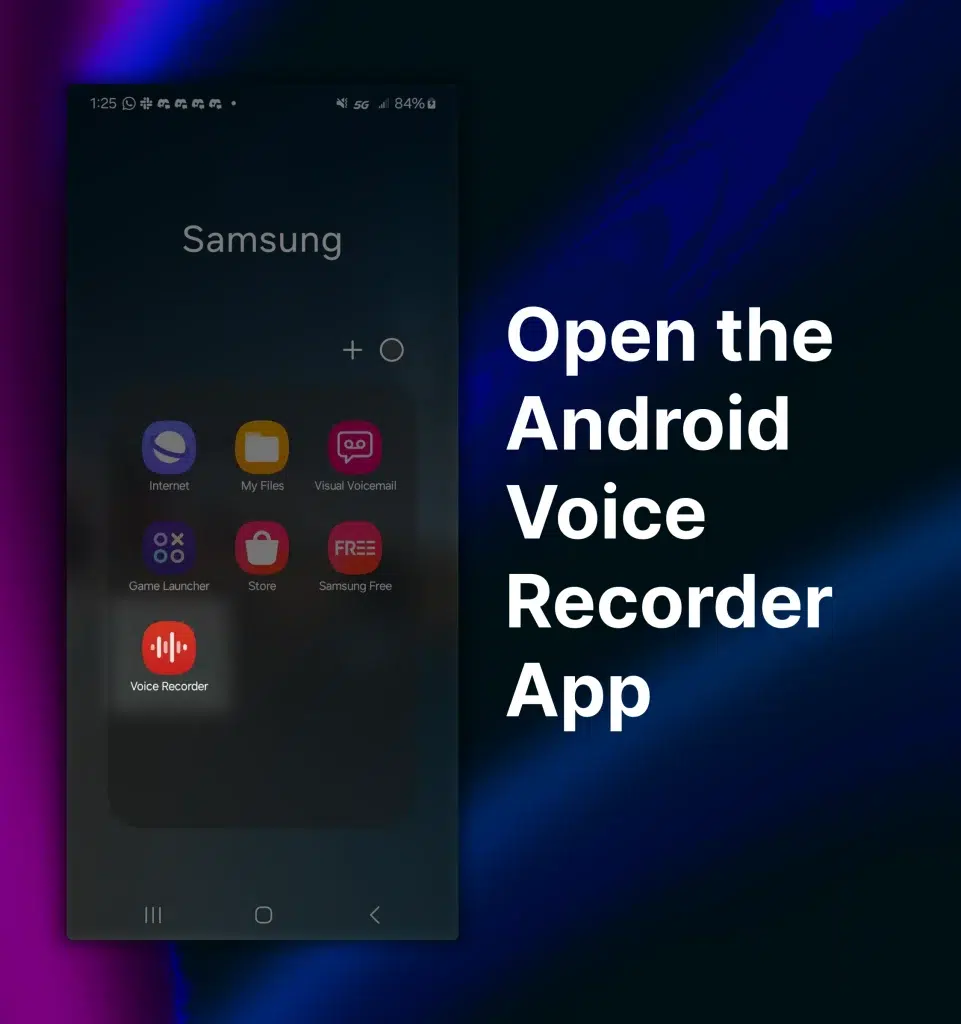
A screenshot showing how to open the Android Voice Recorder.

Step 2: Choose your Android Voice Recording Mode

Most newer Android models let you select a mode for the type of audio you’ll record.

“Standard” is, well, standard, and perfect for basic recordings that won’t be heard publicly. “Interview” mode uses both of your phone’s microphones, so that both you and your subject have a distinct audio track. Finally, “Speech-to-text” mode transcribes what is being said in real-time for up to 10 minutes (this mode operates similarly to speech-to-text iPhone apps).
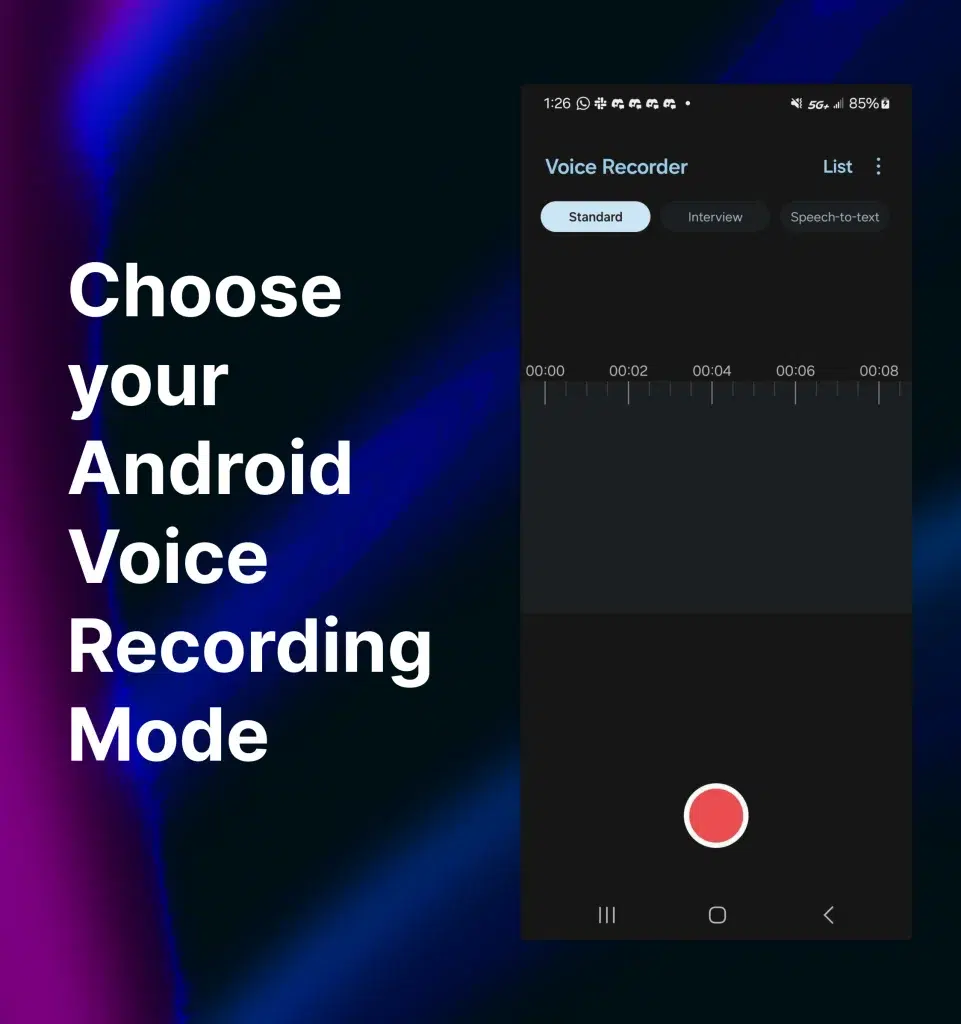
A screenshot showing where to choose your recording mode on an Android device.

Step 3: Begin Recording

After choosing your Android voice recording mode, all you have to do is touch the red circle at the bottom of the app to begin recording. Once it starts, you can touch the “Pause” button to pause and resume your recording. When you’re all finished, hit the black “Stop” button (usually to the right of the “Pause/Play” button). You’ll be prompted to save your recording. Once you touch “Save,” your clip should automatically appear in your files. Some models of Android phones will ask you to name your file before saving.
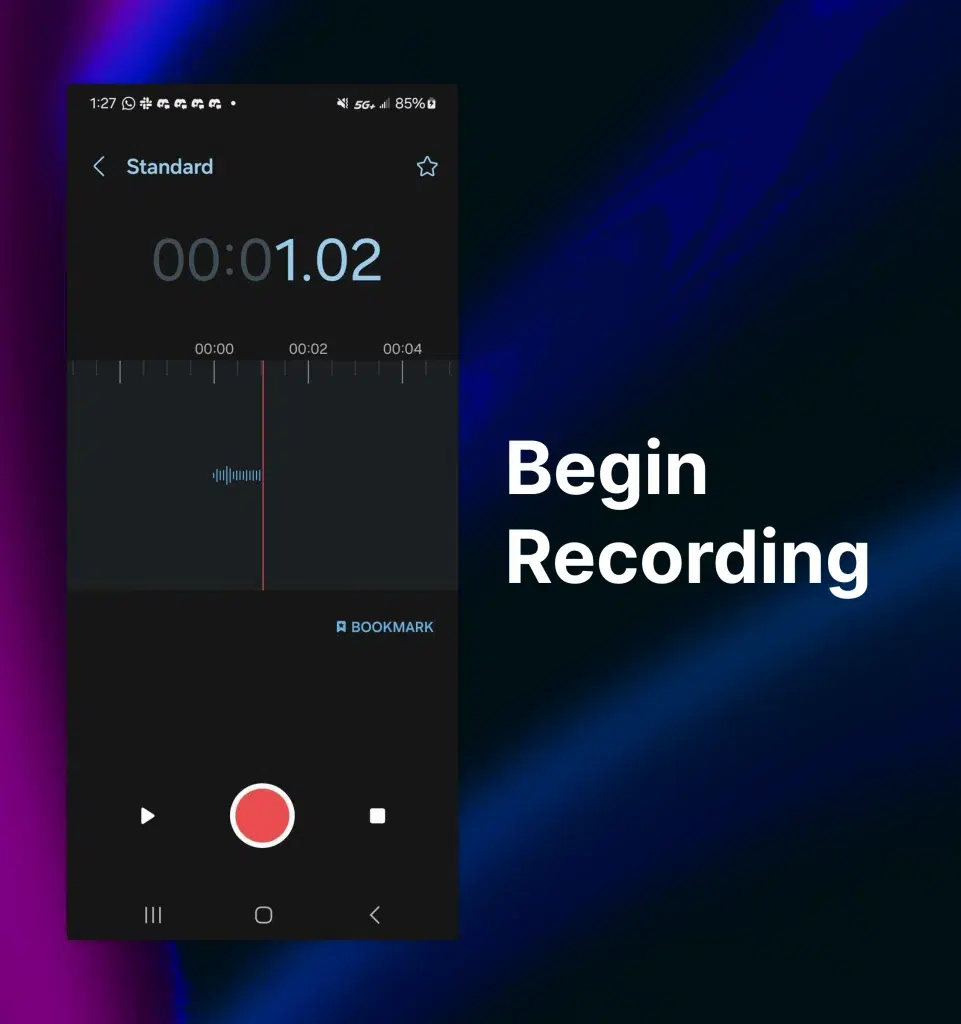
A screenshot showing where to begin recording your voice on an Android device.

To review your recorded audio files on Android, open the Android voice recorder app and tap “List” to see all your files. Click on the one you want to hear. If you used speech-to-text mode, the transcript will appear in your files folder.
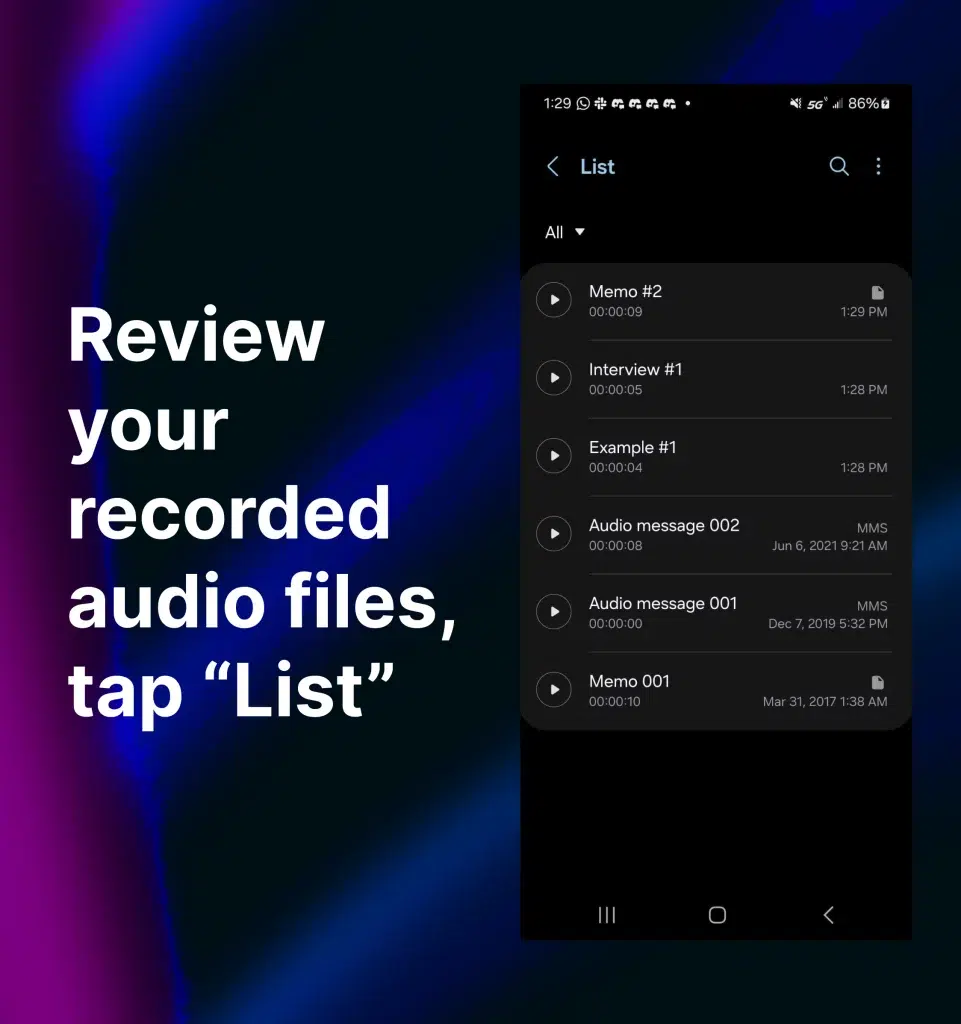
How to review your recorded audio files on Android.

Now you know how to record audio on your Android device using its native app!

How to Record Internal Android Audio

While voice recording on Android is handy, the app only records external sounds. If you want to record audio that is playing on your phone, that’s a whole other enchilada. Luckily, it’s an enchilada that also comes pre-installed on most Android phones. It’s called the Android Screen Recorder and it’ll (you guessed it) record everything that happens on your screen, including all sounds and visuals.

Here’s how to record internal audio (and video) on your Android.

Step 1: Open Your Android Screen Recorder

Your Android screen recorder is available on the phone’s “Utilities” menu, which you can access by pulling down twice on your home screen. The icon for your screen recording app should look like a little movie camera in a box. Tap it!
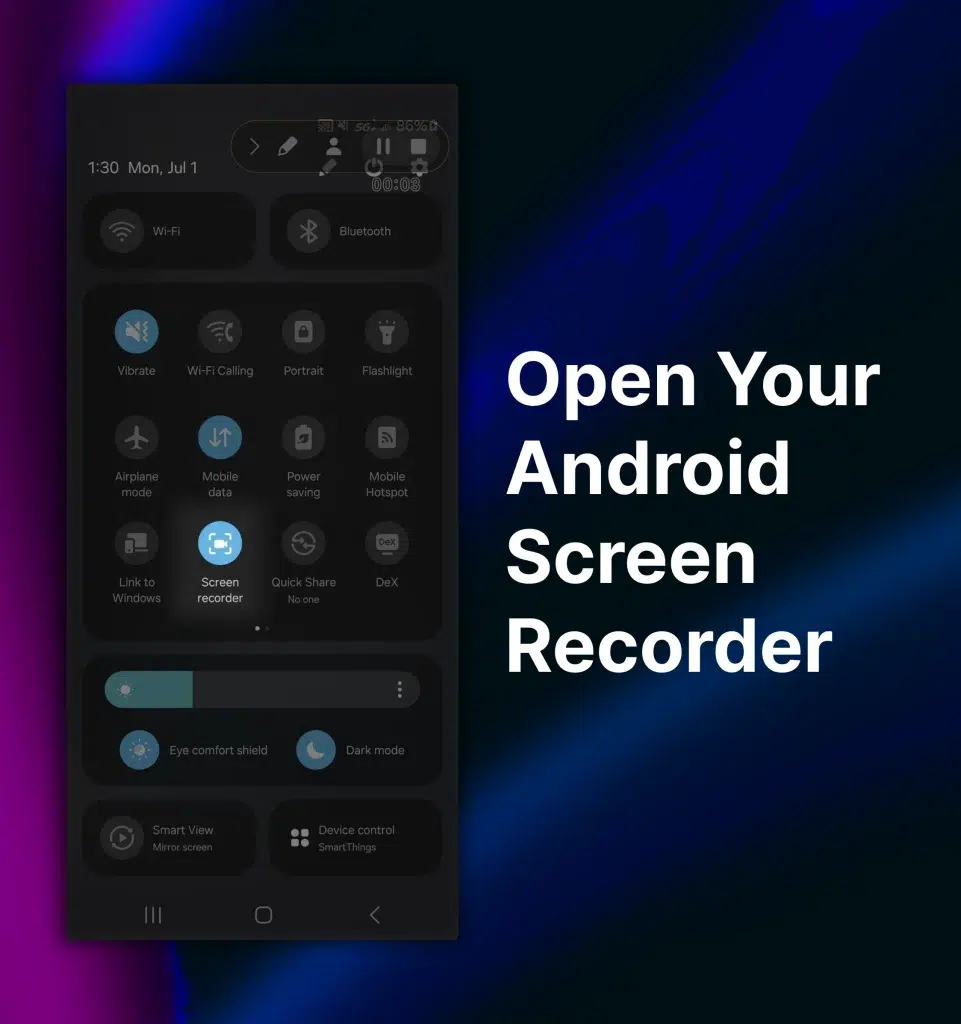
An Android device opened to its screen recorder.

Step 2: Tap “Start Recording”

Tap the words “Start recording” on the bottom right of your screen. You’ll see a three-second countdown to give you a chance to get into the app or video you want to record. At the end of the countdown, anything that happens on your phone screen will be recorded in video form.
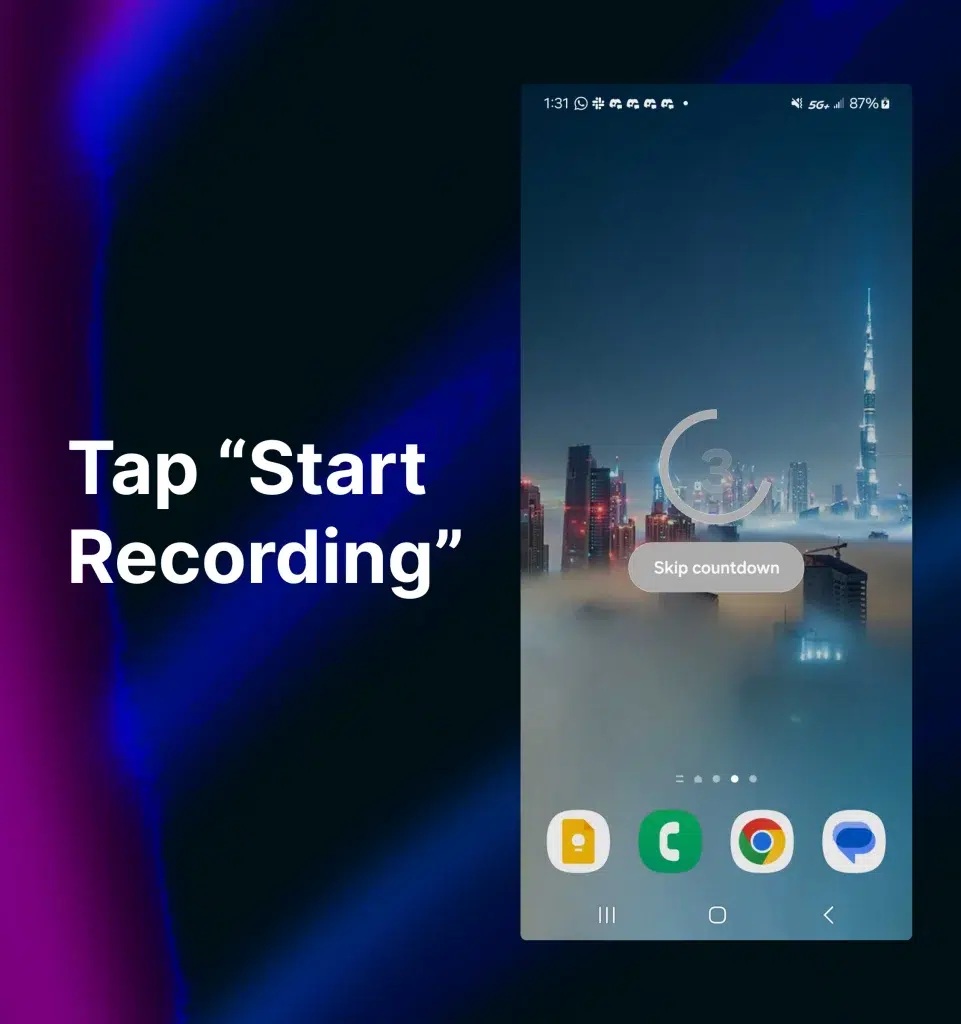
Where to tap “Start Recording” on an Android Device.

When you’re done recording, hit the “Stop” square in the upper right of your screen and your file will automatically save into the “Gallery” app on your Android.

Take note that your screen recording will always be a video file. To convert it to audio-only, you can use an external app like Audio Extractor or Video to MP3 Converter. Your app store will offer plenty of free options.

How to Record Audio With Rev

If the native Android voice recorder isn’t your thing, the Rev Voice Recorder is worth checking out. It adds a little more functionality than your in-phone app, like the ability to easily transcribe any voice recording. Here’s how to record audio on an Android with the Rev Voice Recorder:

  1. Go to your app store and download the Rev Voice Recorder app to your Android
  2. Launch the app and tap the “Record” button to start the recording
  3. Speak clearly into your iPhone’s microphone
  4. Tap the “Pause” button to temporarily stop the recording
  5. Tap “Stop” when you’re all done recording that specific clip
  6. Before you download your recording, click “Preview” to replay your recording and make sure you captured what you planned to capture
  7. Click “Download” to save your file. If you aren’t happy with it, click “Delete” instead

The Rev Voice Recorder is also available within the Rev Mobile App if you’re already using Rev on your Android device.

Other Ways to Record Android Audio

In our opinion, the Rev Voice Recorder is the best voice recorder for Android due to how easily it integrates with Rev’s comprehensive suite of transcription services. But if you want to explore the studio space, here are a few other options for recording voice on an Android:

  • Easy Voice Recorder Pro is a free recorder with a one-tap recording
  • Otter Voice Notes will transcribe live recordings (check out our guide to Rev vs. Otter for more info)
  • RecForge II lets you schedule a recording ahead of time and it’ll also extract sound from video
  • Tape-a-Talk is a fairly simple voice recording app for Android, but it offers the option to change your color scheme or set a recorded clip as your ringtone

Tips for Improving Audio Quality

It’s awfully handy to be able to record audio on your Android device. If you’re recording with your phone, chances are you’re not lugging a bunch of gear around, but there are a few things you can do to improve the quality of your recording:

  • Getting an Android external microphone is the best possible thing you can do. Cheap wireless microphones are vastly superior to your phone’s mic.
  • Reduce background noise. This should go without saying, but any background noise can sincerely disrupt a recording, especially if you plan to edit or transcribe it later. A quiet setting with minimal distraction is ideal.
  • Speak clearly into the microphone. Whether you’re using your Android’s mic or you bought a decent external setup, make sure that both speakers are no more than six inches away from their microphone, speaking crisply and clearly.

Benefits of Recording Audio on the Go

Being able to record audio files on Android while on the go is a huge step forward for journalists, podcasters, or anyone who notes a lot of their own thoughts. You never know when a great interview opportunity will pop up or when your brain will conjure up a brilliant idea that simply must get down “on paper,” so your Android’s voice recording app is a great tool to have at your disposal (you can even record your blog ideas).

Your Android lets you capture every stray thought, record a podcast anywhere at any time, or, heck, even capture the sounds of nature if that’s what you’re into. None of this was really available even 15 years ago. Who knew your Android voice recorder would be so useful? (Recording audio on your iPhone is pretty handy, too!)

The Rev Mobile App can be a pretty handy tool for recording on the go, as well.

Use Your Android Voice Recording Wisely

Now that you know how to record audio on Android, be sure to get the most out of that recording. Rev offers a variety of transcription services that convert voice recordings to text, making it simple to review, use, and edit any audio recording, especially if you use the Rev Voice Recorder on your Android device.

Check it out!

Subscribe to the Rev Blog

Lectus donec nisi placerat suscipit tellus pellentesque turpis amet.

Share this post

Subscribe to The Rev Blog

Sign up to get Rev content delivered straight to your inbox.

General

How To Record Audio On Your Android Device

Having a tiny supercomputer in your pocket at all times is pretty handy, isn’t it? Your Android device is your watch, your music player, and your personal assistant. Heck, it’ll even tell you a joke. But one of the more underrated apps on your phone is the Android voice recorder.

Whether an impromptu interview opportunity pops up or you just need to record your own thoughts, the Android voice recorder is there. You can even record a whole podcast on your phone in a pinch!

Your phone’s built-in microphone isn’t always the ideal choice for audio recording, but voice recording on Android can get the job done when you need it. Here’s how to record audio on your Android device, no matter how you plan to use it.

Recording Audio on an Android via the Native App

Android phones come in a plethora of models from various manufacturers, including Samsung, Google, Sony, and Motorola, so the specific details of how to record audio on your Android device might vary slightly from what we post here.

But whether you’re using the Samsung voice recorder, the Google voice recorder, or any of the others, if it uses the Android operating system, the steps should be pretty similar for recording external audio.

Step 1: Open the Android Voice Recorder App

Your home screen should come preloaded with the red voice recorder app icon, but if you can’t find it, open “Settings,” then hit “Apps” and tap on the voice recorder. If for some reason it’s not installed on your Android device, you might need to download it from your app store.

A screenshot showing how to open the Android Voice Recorder.

Step 2: Choose your Android Voice Recording Mode

Most newer Android models let you select a mode for the type of audio you’ll record.

“Standard” is, well, standard, and perfect for basic recordings that won’t be heard publicly. “Interview” mode uses both of your phone’s microphones, so that both you and your subject have a distinct audio track. Finally, “Speech-to-text” mode transcribes what is being said in real-time for up to 10 minutes (this mode operates similarly to speech-to-text iPhone apps).

A screenshot showing where to choose your recording mode on an Android device.

Step 3: Begin Recording

After choosing your Android voice recording mode, all you have to do is touch the red circle at the bottom of the app to begin recording. Once it starts, you can touch the “Pause” button to pause and resume your recording. When you’re all finished, hit the black “Stop” button (usually to the right of the “Pause/Play” button). You’ll be prompted to save your recording. Once you touch “Save,” your clip should automatically appear in your files. Some models of Android phones will ask you to name your file before saving.

A screenshot showing where to begin recording your voice on an Android device.

To review your recorded audio files on Android, open the Android voice recorder app and tap “List” to see all your files. Click on the one you want to hear. If you used speech-to-text mode, the transcript will appear in your files folder.

How to review your recorded audio files on Android.

Now you know how to record audio on your Android device using its native app!

How to Record Internal Android Audio

While voice recording on Android is handy, the app only records external sounds. If you want to record audio that is playing on your phone, that’s a whole other enchilada. Luckily, it’s an enchilada that also comes pre-installed on most Android phones. It’s called the Android Screen Recorder and it’ll (you guessed it) record everything that happens on your screen, including all sounds and visuals.

Here’s how to record internal audio (and video) on your Android.

Step 1: Open Your Android Screen Recorder

Your Android screen recorder is available on the phone’s “Utilities” menu, which you can access by pulling down twice on your home screen. The icon for your screen recording app should look like a little movie camera in a box. Tap it!

An Android device opened to its screen recorder.

Step 2: Tap “Start Recording”

Tap the words “Start recording” on the bottom right of your screen. You’ll see a three-second countdown to give you a chance to get into the app or video you want to record. At the end of the countdown, anything that happens on your phone screen will be recorded in video form.

Where to tap “Start Recording” on an Android Device.

When you’re done recording, hit the “Stop” square in the upper right of your screen and your file will automatically save into the “Gallery” app on your Android.

Take note that your screen recording will always be a video file. To convert it to audio-only, you can use an external app like Audio Extractor or Video to MP3 Converter. Your app store will offer plenty of free options.

How to Record Audio With Rev

If the native Android voice recorder isn’t your thing, the Rev Voice Recorder is worth checking out. It adds a little more functionality than your in-phone app, like the ability to easily transcribe any voice recording. Here’s how to record audio on an Android with the Rev Voice Recorder:

  1. Go to your app store and download the Rev Voice Recorder app to your Android
  2. Launch the app and tap the “Record” button to start the recording
  3. Speak clearly into your iPhone’s microphone
  4. Tap the “Pause” button to temporarily stop the recording
  5. Tap “Stop” when you’re all done recording that specific clip
  6. Before you download your recording, click “Preview” to replay your recording and make sure you captured what you planned to capture
  7. Click “Download” to save your file. If you aren’t happy with it, click “Delete” instead

The Rev Voice Recorder is also available within the Rev Mobile App if you’re already using Rev on your Android device.

Other Ways to Record Android Audio

In our opinion, the Rev Voice Recorder is the best voice recorder for Android due to how easily it integrates with Rev’s comprehensive suite of transcription services. But if you want to explore the studio space, here are a few other options for recording voice on an Android:

  • Easy Voice Recorder Pro is a free recorder with a one-tap recording
  • Otter Voice Notes will transcribe live recordings (check out our guide to Rev vs. Otter for more info)
  • RecForge II lets you schedule a recording ahead of time and it’ll also extract sound from video
  • Tape-a-Talk is a fairly simple voice recording app for Android, but it offers the option to change your color scheme or set a recorded clip as your ringtone

Tips for Improving Audio Quality

It’s awfully handy to be able to record audio on your Android device. If you’re recording with your phone, chances are you’re not lugging a bunch of gear around, but there are a few things you can do to improve the quality of your recording:

  • Getting an Android external microphone is the best possible thing you can do. Cheap wireless microphones are vastly superior to your phone’s mic.
  • Reduce background noise. This should go without saying, but any background noise can sincerely disrupt a recording, especially if you plan to edit or transcribe it later. A quiet setting with minimal distraction is ideal.
  • Speak clearly into the microphone. Whether you’re using your Android’s mic or you bought a decent external setup, make sure that both speakers are no more than six inches away from their microphone, speaking crisply and clearly.

Benefits of Recording Audio on the Go

Being able to record audio files on Android while on the go is a huge step forward for journalists, podcasters, or anyone who notes a lot of their own thoughts. You never know when a great interview opportunity will pop up or when your brain will conjure up a brilliant idea that simply must get down “on paper,” so your Android’s voice recording app is a great tool to have at your disposal (you can even record your blog ideas).

Your Android lets you capture every stray thought, record a podcast anywhere at any time, or, heck, even capture the sounds of nature if that’s what you’re into. None of this was really available even 15 years ago. Who knew your Android voice recorder would be so useful? (Recording audio on your iPhone is pretty handy, too!)

The Rev Mobile App can be a pretty handy tool for recording on the go, as well.

Use Your Android Voice Recording Wisely

Now that you know how to record audio on Android, be sure to get the most out of that recording. Rev offers a variety of transcription services that convert voice recordings to text, making it simple to review, use, and edit any audio recording, especially if you use the Rev Voice Recorder on your Android device.

Check it out!

The event's speakers are:

No items found.